
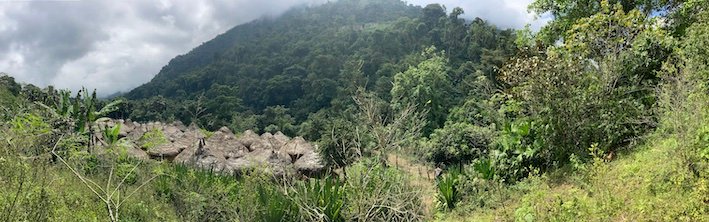
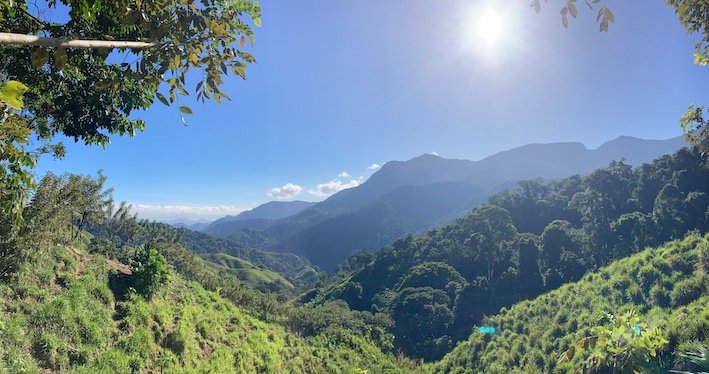
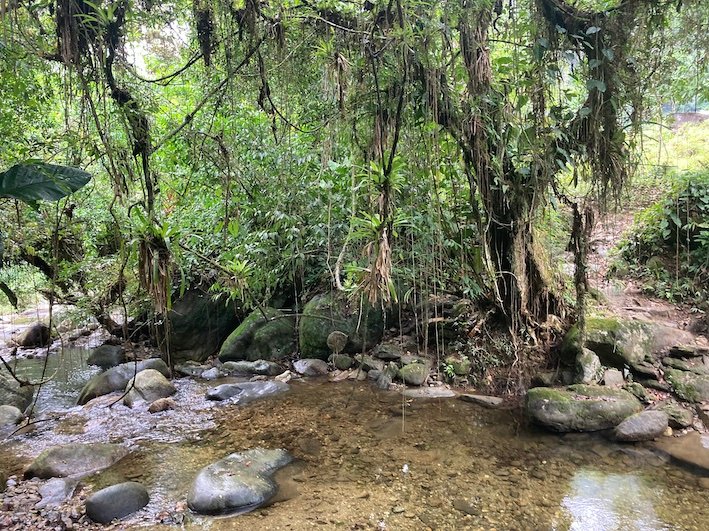
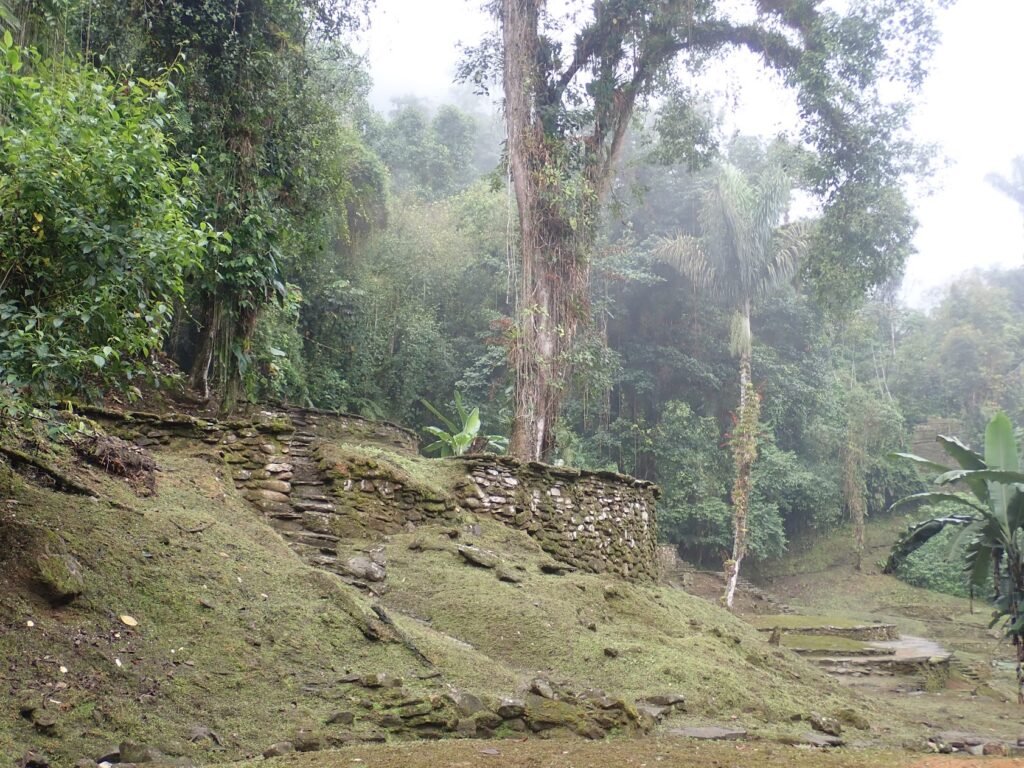
Nestled deep in the Sierra Nevada de Santa Marta mountains, the Ciudad Perdida was built by the Tayrona people between the 11th and 14th centuries and is one of the largest pre-Colombian towns discovered in the Americas. The Ciudad Perdida became the “Lost City” when it disappeared into the jungle around the time of the Spanish conquest, and was “found” again in the 1970s by grave robbers. Trekking to the Ciudad e Perdida or “Lost City” is one of Colombia’s most popular and breathtaking multiday hikes. The Ciudad Perdida was once one of the most important spiritual and social villages for the Tayrona people. While the wooden houses of the Tayrona people are now gone, the 170 stone terraces that formed the foundations for the houses still remain. Jens was able to join me during my sabbatical in “finding” the Lost City and trekking to the Ciudad Perdida together in Colombia.
Contents:
- Tour Options
- Food and drink
- The Camps
- 4 day vs. 5 day trek
- Luggage storage options
- Visiting Tayrona National Park after the Ciudad Perdida
- Day 1: Santa Marta/El Mamay to Camp 1: 7KM
- Day 2: Camp 1 to Mamo Romualdo (Camp 3): 17KM
- Day 3: Camp 3/Lost City/Camp 2: 11KM
- Day 4: Camp 2 to El Mamay: 16KM
- Packing list
- Final Thoughts on the Ciudad Perdida trek
Tour Options:
The Ciudad Perdida trek is a 4 or 5 day multiday hike that must be done with a government sanctioned tour company. The tour price includes a guide, translator, all food, water, snacks, and accommodations in encampments along the trail. The price is also the same whether you do the 4 day trek or the 5 day trek.
Food and drink:
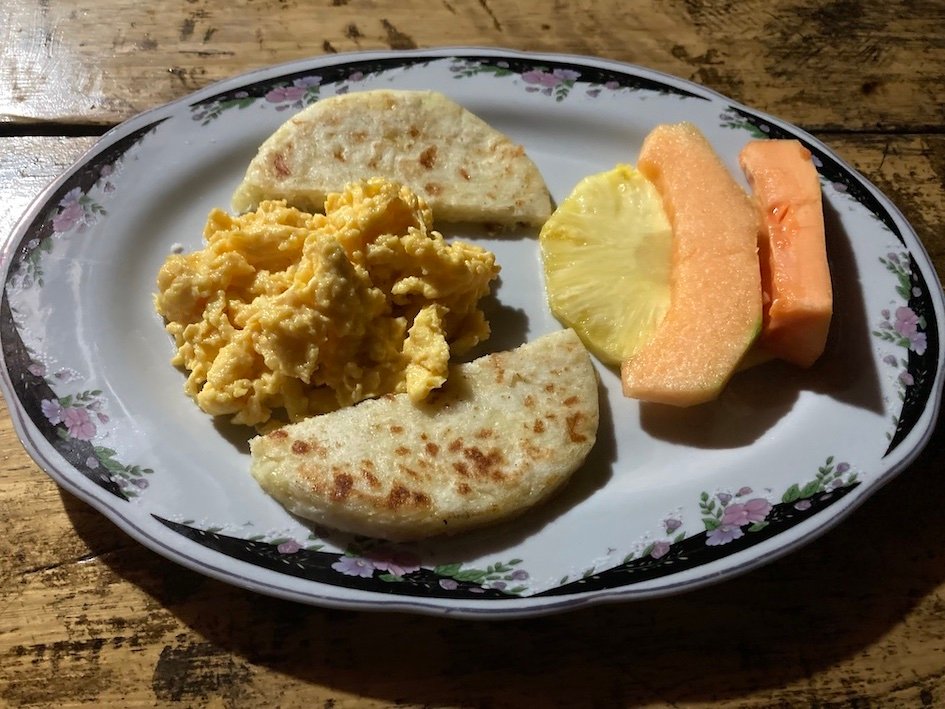
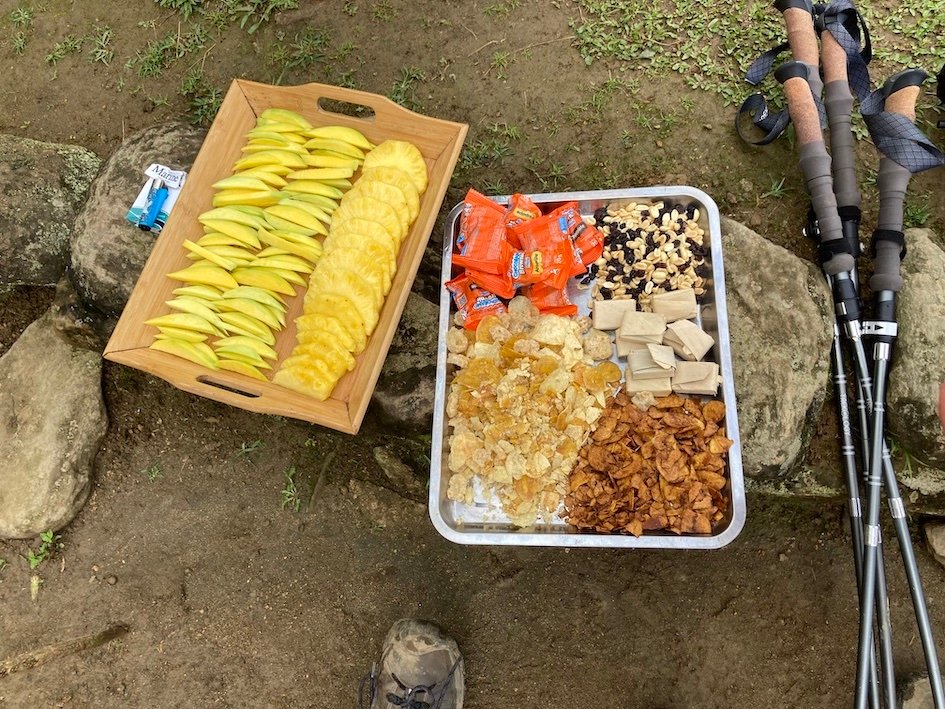
All food, snacks, and drinking water are included in the package price. The meals provided were more than enough and quite delicious – especially considering everything has to be brought in by mule. There are also snacks (potato chips, candy bars etc.) and drinks (Gatorade, juice, pop, beer etc.) available for sale at the camps. In terms of drinking water, you’ll need to bring water in a suitable sized drinking vessel (at least 1.5L) the 1st day, and purified water for refills will be provided for the rest of the trip. I would recommend bringing a water bladder so you don’t have to take your backpack off to get a water bottle every time you want a sip of water. The tour companies are also great about providing complimentary snacks along the trail as well – many times you crest a hill just to be rewarded with large amounts of freshly cut fruits like watermelon at the top – which tastes like heaven after a long climb in the jungle.


The Camps:
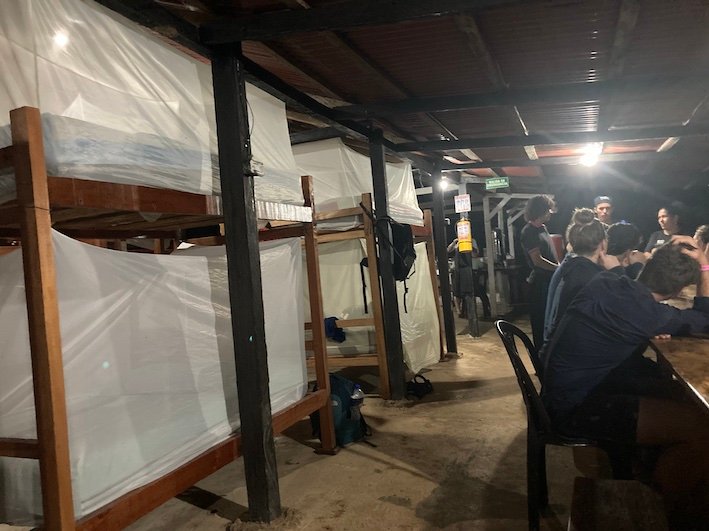
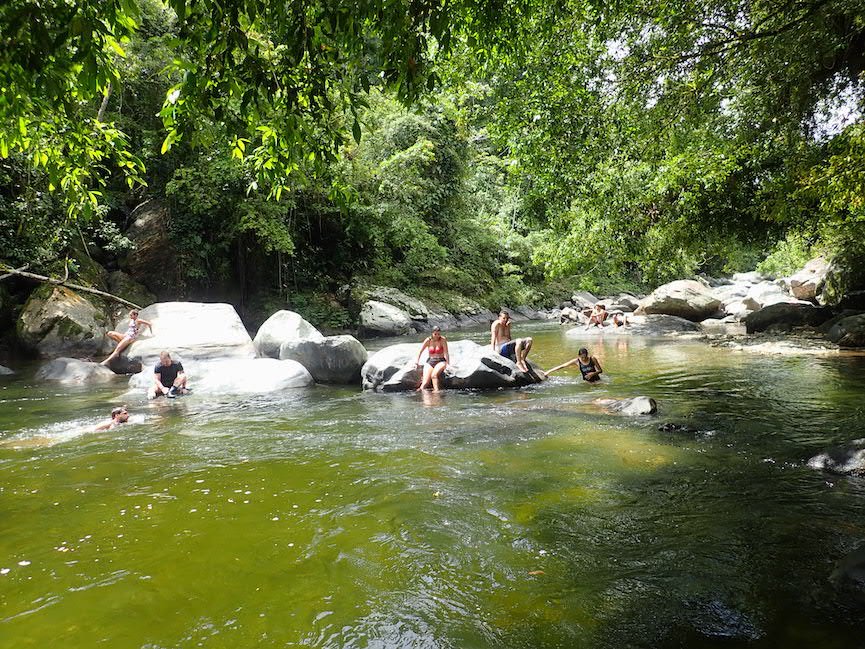
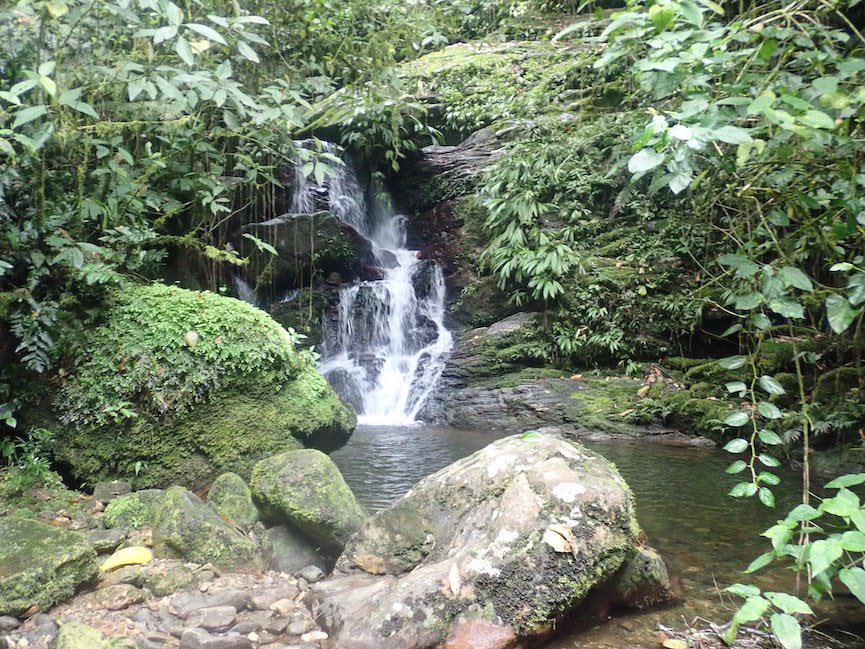
In general, the campsites are remarkably well-equipped for being in the middle of the jungle. The covered sites have bunk-beds and mosquito nets as well as toilets and cold water showers. Some camps even have chargers. Most camps also have a natural swimming spot by the river or a waterfall, so you can get a cooling swim in before dinner and a proper shower if you still want it later on. Note: while you may be tempted to wash your clothes on the trek, don’t bother unless it is truly, remarkably quick-dying material. Stuff simply doesn’t dry in the jungle, so be prepared to wear your clothes damp from the previous day – if you wash the item, it will likely be same degree of wetness as it was when you left it the night before.
4 day vs. 5 day trek:
Jens and I decided to do the 4 day trek rather than 5 day trek as the only difference between the two options is that the 5 day trek simply splits the last day of the 4 day trek into two days instead of one day. So doing the trek in 4 days vs. 5 days does not give you more time in the Lost City, but does make the last part of the trek easier. Note, the trek is an out-and-back trek, so extending the trek from 4 days to 5 days, also does not give you more time to enjoy new scenery as you walk the same path back as you took to the Ciudad Perdida.
Luggage storage options:
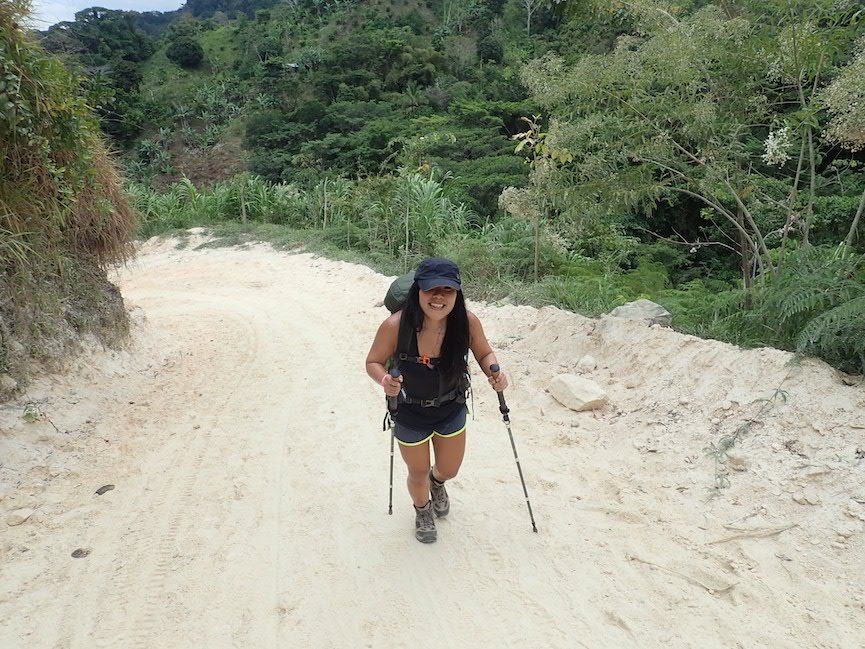
You can securely store your larger luggage at the tour operator offices in Santa Marta for the duration of the hike. Bring a day pack with just the essentials for the 4 or 5 day trek, and leave the rest behind as any extra weight is going to feel doubly heavy on this strenuous hike. In addition to your hiking backpack, you might consider bringing a small foldable daypack – for the hike up to the Ciudad Perdida on day three, so you can leave your larger hiking backpack at the camp – as you double back there to retrieve the rest of your items after visiting the Ciudad Perdida.
Visiting Tayrona National Park After the Ciudad Perdida:
If you are planning to visit the Tayrona National Park area after the hike you might want to inquire with the tour operator if you can leave your larger luggage at the restaurant at the trailhead in El Mamay instead, as that is the end point of the trek, and much closer to Tayrona National Park. So you can pick up all your luggage at the end of the hike, and then be dropped off at your accommodations closer to Tayrona National Park rather than going all the way back to the Santa Marta area.
Instead of heading all the way back to Santa Marta at the end of the hike; a few people from my hiking party who were planning to visit Tayrona National Park after the trek organised with the tour operator to get dropped off at these stunning oceanfront lodges at Playa Pika Cabanas on the way back to Santa Marta from El Mamay, and saved themselves a lot of travel time as they stayed just next to the park rather than going all the way back to Santa Marta.
There are even accommodations inside of Tayrona National Park itself, like Ecolodge Playa Brava Teyumakke and Wachakyta Ecolodge that you may consider – as the route back to Santa Marta actually passes one of the entrance gates of Tayrona National Park.
If interested being dropped off near Tayrona National park, just contact the tour operator ahead of time, and you can leave your luggage at the trailhead/trailend restaurant in El Mamay, so you can be simply dropped off at (or near) an accommodations option by Tayrona National Park instead of going all the way back to Santa Marta. This is what Jens and I would have done if we were to do this over again.

Day 1: Santa Marta/El Mamay to Camp 1: 7KM
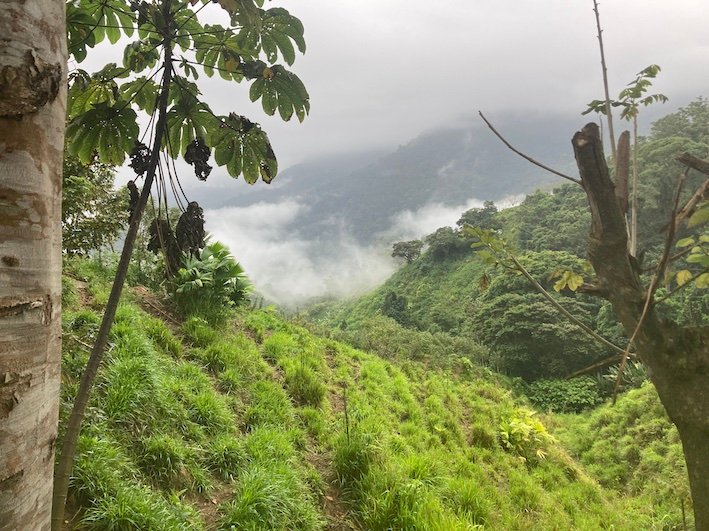
This day started with a morning pickup from our hotel at 7am. We were taken to meet the rest of our tour group, our guide and translator at the tour office in Santa Marta; and were able to drop off our larger luggage for secure storage during our trek at the tour office, before we boarded a bus to the trailhead. Once we got to the trailhead, we had lunch a restaurant at the trailhead before setting off on the first day of walking. Distance-wise Day 1 is one of the shortest days kilometer-wise on the Ciudad Perdida trek; however, it’s not necessarily the easiest, as the day entails significant climbing without much forest cover – so you’ll be hiking in the heat of midday without much cover – for some this will be more challenging than hiking more kilometers. A hat, plenty of sunscreen, water and walking sticks are highly recommended.
We settled into Camp 1 by late afternoon, and enjoy a refreshing jump in the swimming hole at the campsite. A delicious dinner of whole fried fish was served along with GOL bars for dessert. Cold beers were available for sale for about 7000 COP (approx $1.75 USD). Charging outlets were available so don’t forget your chargers if you need them.
Day 2: Camp 1 to Mamo Romualdo (Camp 3): 17KM
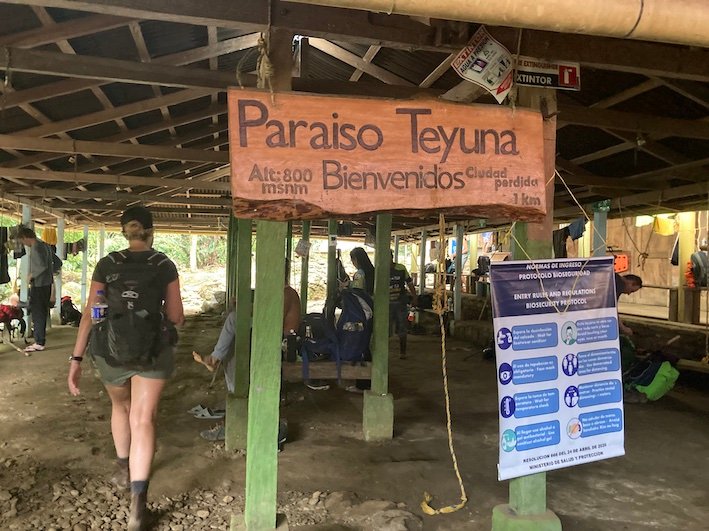
Day 2 starts early at 6am, as it is the longest hiking day distance-wise. We stop at the indigenous village of Mutanzi, where we learn about indigenous practices around the coca plant as well as well as around the local agave plant used to make clothing and woven baskets and bags. After the presentation, we walk another hour further to Camp 2 (this is the camp where we will stay at on day 3 but is our lunch stop on day 2). After lunch we hike a few more hours to Camp Mamo Romualdo right at the entry to the Lost City itself. Here again, is a lovely swim spot at camp where you can swim and wash up before dinner.
After dinner, our guide (who has worked both as a guide and an archeologist for over 20 years at the Ciudad Perdida) recounted to us some funny stories about past treks – including a story when a few tourists got their hands on some Angel’s Trumpet flowers – after hearing that they had hallucinogenic properties. Let’s just say you should not dabble with Angel’s trumpet flowers – and that the tourists survived, after spending a longer time than necessary self-incapacitated in the jungle.

Day 3: Camp 3/Lost City/Camp 2: 11KM
Day 3 is divided in two parts. The morning is when we make the trek up to the Lost City itself, and spend about 2 hours on a guided tour of the city. The climb is up a ton of stone steps (if it has been raining these steps can be treacherously slippery so be careful!). You are encouraged to leave your heavy belongings at the camp as you will double-back after touring the Lost City to retrieve all your items at Camp 3 for the second part of the day – which is the hike back down to camp 2 where you will sleep later that evening.
The Lost City was amazing. There’s always risk of the mist obscuring the views of the stone city; and while it was indeed misty when we first arrived in the city, the mist cleared up as our guided tour wore on to allow for amazing views. A highlight of the Lost City tour, was meeting the Mamo – the spiritual leader of the indigenous groups in the region. Mamos train for decades to be chosen as leaders of their communities. Many of these years of training are also isolation. Our guide happened to be friends with the current Mamo when they were both young men and their relationship endures today. The Mamo gave those of us who wanted one, a bracelet and his blessings for protection. It was an amazing experience to meet this person in such an amazing and spiritually important place.

Day 4: Camp 2 to El Mamay: 16KM
The final day of the trek was the hardest in my opinion. It’s the 2nd longest day in terms of kilometers at 16KM; and it’s also has quite a bit of hiking in the hot midday sun in the 2nd half of the day back out the trailhead at El Mamay. Of course, it’s also a little harder as it’s backtracking through trail that you had already done before. One upside (for some) is that it is primarily net downhill – however, this can have some disadvantages if you’re already suffering from any knee or foot pain as downhill sections can exacerbate these issues.
Your trek is complete once you arrive back at the trailhead in El Mamay. A nice lunch and cold drinks and beer (for purchase) will be waiting for you as well as cold (as always) showers.
Packing list:
- Hiking boots. Saloman Quest boots are some of the best hiking boots on the market: Women. Men
- Hiking poles. I use these tri-fold hiking poles extensively. They fold up to fit in most daypacks, and also have attachments for skiing.
- 25-40L hiking backpack. This hiking daypack is compact, affordable and has back support. If you want a compact option, this folding hiking daypack folds away – it’s the pack I used for the Ciudad Perdida hike.
- Water-bladder with tube straw – I always carry this with me when I travel, and it is amazing when you’re hiking because you don’t have to stop, and take off your backpack when you want a sip of water, the tube is always conveniently there, and you drink without breaking your stride
- Sunscreen
- Bug spray (I prefer Icaridin based bug sprays. They work as well as Deet, but are much safer).
- Insect bite healer. This device is basically like a mini heat-pen that when applied to a fresh bite, denatures the poison from the insect bite and greatly reduces/eliminates itching and swelling. This is an absolute game-changer for those who have allergic reactions to bug bites. I normally get very bad swelling and itching from any bite that I get – but if I use this device when the bite is fresh, there is typically no evidence I even had a bite the next day!
- Bug shirt (if you’re particularly mosquito prone)
- Bug pants (same idea as the bug shirt – also depending on how sweet your blood is – you might want to wear a bug shirt + pants over your clothes even if you’re using bug spray)
- Flip flops or Chacos/Tevas (if you’re going during wet season you might want to opt for the Chacos in case you need to cross swollen streams by foot – it was fairly dry when Jens and I went in March so no shoeless river crossings were required)
- Lightweight travel towel
- Bar shampoo – this can also double as your everything soap
- 3 quick drying t-shirts. Icebreaker t-shirts are my favourite. They are odor resistant and dry quickly. Mens.
- 2 quick drying shorts. I love Nike tempo shorts – they are lightweight and quick-drying.
- 2 sports bras (Optional for women: one for hiking, one for when you’re not hiking)
- 2-3 pairs of socks. I strongly recommend Icebreaker socks. Not only are they lightweight, anti-microbial and quick-drying, but Icebreaker also has a lifetime warranty on their socks – so if they ever develop holes, you can just bring them back to the store, or complete an easy warranty request online with photos of the damaged socks, get a gift-card for the value of what you paid for the socks to buy new socks or other ice-breaker
- 4 pairs lightweight underwear. I like Icebreaker products because they’re lightweight, quick-drying and antimicrobial.
- Bathing suit
- brimmed hat
- $200 – $300USD in cash. You likely won’t need this much cash, but if you get hurt and need to use a mule, they will be asking for payment in cash – so best to have extra just in case.
- Camera and associated adaptor. (As I am an avid diver and snorkeler, I use this waterproof, shock proof camera, that is waterproof up to 30m and shockproof up to 8m. Another camera that I’ve seen other travellers use is the Sony CyberShot DSCHX99 which has a 30X Zoom with near-professional quality clarity. The quality is similar to professional cameras in small 8.5oz point-and-shoot device)
- Power bank. For airline travel select powerbanks under 26,000mAH in order to avoid having them confiscated. This one is 20,000 mAH.
- Charging block (there are actually charging stations at some of the camps if you need them). I use this travel adaptor even when I’m in North America because of its multiple USB slots as well as a USB-C slot. Works with all my Apple products!
- Charging cords
- Rain poncho. I always carry 1-2 of these emergency clear rain ponchos with me when I travel. They are super light (about 50grams), and can be used about 5-10 times before they start to rip.
- Sleep liner. The camp beds include mosquito nets and bedding, but Jens and I always used our own sleep liners for extra security. Silk sleep liners are about 3X the cost of conventional liners, but they’re also 1/3 the weight.
Optional items:
- Antihistamines – in case of allergic reaction on the road or to help with swelling associated with bug bites (if you’re allergic)
- Benadryl “itch stick” for bug bites. Instant relief from insect bites.
- Water-resistant band-aids. (I take the band-aids out of the box and put them in a ziplock bag to reduce bulk. The ziplock also acts as a lightweight waterproof container)
- Polysporin (This greatly accelerates healing for small cuts and scrapes, and prevents infection.)
- Bug spray (I love this DEET-free repellent that kept me completely bite free in India)
- Sunscreen (I really like this Ombrelle sport spray – it sprays on clear – and great if you’re travelling solo – you can get your back with the spray!)
- Arnica (My go-to non-drug treatment for any bumps/bruises/inflammation while travelling. Great for anyone allergic to Advil like I am.)

Final thoughts on the Ciudad Perdida Trek:
The Ciudad Perdida trek, is a strenuous but rewarding hike through jungle landscapes that until fairly recently, were completely off-limits to both foreigners and Colombians. The trek is highly regulated, and proceeds from the tours that you take do go to support the locals living in the area. One of the most rewarding parts of the trek were my interactions with the indigenous people who lived along the trail. Of course the crowning glory of actually visiting the lost city itself cannot be understated. Jens and I immensely enjoyed this trek. We hiked hard every day, and were rewarded with swims in rivers and waterfalls, and the camping aspect of the trek can only be described as “glamping” given all the meals are prepared for you, and your bed is ready for you to hop into each night. Ice cold beers somehow being available at the remote campsites each night could not be understated as well.
Thanks for the very inspiring review! Appreciate it!
Thanks so much Alex! 🙂